The Redmond giant released Windows 11 official system requirements and a PC Health Check tool to let users check if they will get the Windows 11 update or not. And well, if you have used the PC Health Check app, you know it’s barebones and buggy. It doesn’t explain why you are seeing the “This PC Can’t Run Windows 11” error and how to fix it. Worry not! A free, open-source app called WhyNotWin11 is here to your rescue and will tell you exactly why your PC can’t upgrade to Windows 11. So without any further ado, let’s dive in.
Find out Why Your PC Can’t Upgrade to Windows 11
Before we explain how to download and use this third-party app to check why your PC can’t run Windows 11, let’s quickly take a look at the categories, including SecureBoot, TPM, and compatible CPU, that the app checks for on your computer.
What All Categories the WhyNotWin11 App Checks For
Hard Floor Checks
Core Count (CPU) >= 2 CPU Frequency >= 1 GHZ CPU Architecture = 64-bit (Windows 11 does not support 32-bit processors) RAM Installed >= 4 GB Storage Available >= 64 GB SecureBoot
Soft Floor Checks
TPM Version >= 2.0 Windows 11 CPU Compatibility list. You can check the list of Intel, AMD, and Qualcomm CPUs compatible with Windows 11 via the linked article.
Other Categories
DirectX 12 WDDM 2 Boot Method Disk Partition Type
How to Use WhyNotWin11 App to Check Why Your PC Can’t Run Windows 11
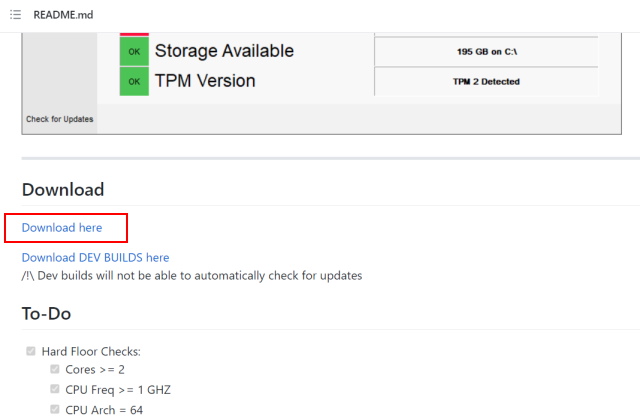
First, head over to this Github page and download the WhyNotWin11 tool on your existing Windows 10 PC.
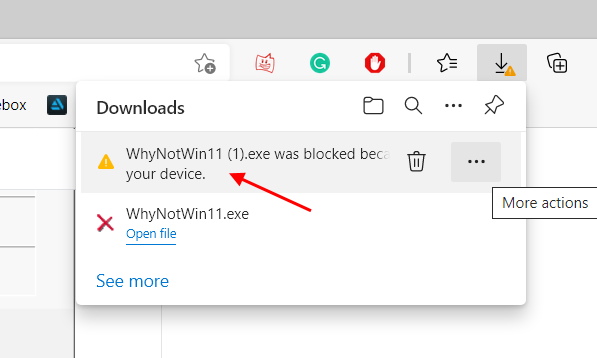
Now, since the app is not signed, Microsoft will block the download if you are using the Edge browser. You will see the “WhyNotWin11.exe was blocked because it could harm your device” error. Don’t worry, though. It won’t harm your computer, and you can bypass it.
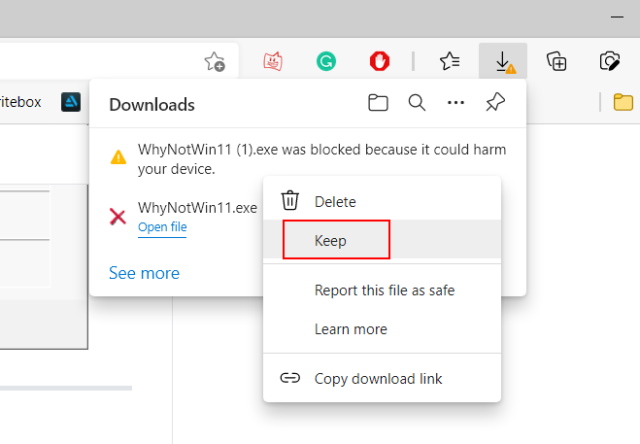
Note: If you are using Google Chrome or any other browser on Windows 10, the app will download right away. But, Microsoft Defender SmartScreen will block the app from running when you open the EXE file. You will see a “Windows protected your PC” message, where you need to tap on “More info -> Run anyway” to use the WhyNotWin11 tool. 3. As for Edge users, hover on the error message in the “Downloads” section and click the three-dots menu icon. Then, click on “Keep” from the pop-up menu.
- Next up, on the “This app might harm your device” pop-up menu, click on “Show more” followed by “Keep anyway” to download the tool.
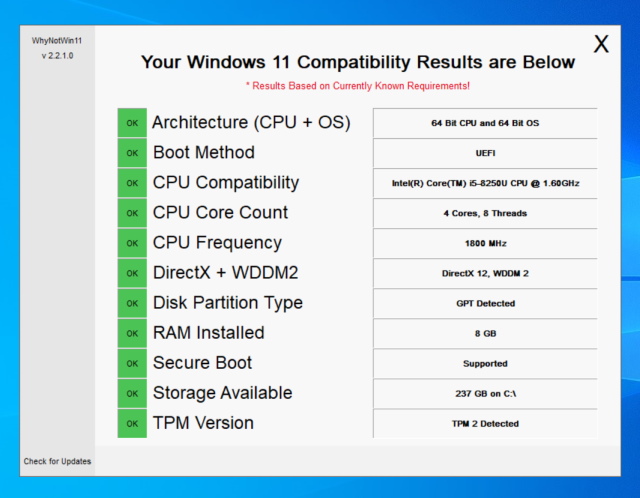
- Now, double-click on the WhyNotWin11.exe file to check your PC’s compatibility with Windows 11. The tool takes a couple of minutes to perform the check, so have patience, and wait for the results. As you can see in the image below, my Xiaomi Mi Notebook is eligible for the Windows 11 update:
Perfect Solution for ‘This PC Can’t Run Windows 11’ Error!
So yeah, if you used Microsoft’s official PC Health Check app and ran into the “This PC can’t run Windows 11” error, this open-source app will tell you exactly what is not in line with the Windows 11 system requirements on your PC. If you discover that TPM or SecureBoot is the root of the problem, we have explained how to enable them in this nifty guide to fix the “This PC can’t run Windows 11” error. We are currently working on an in-depth explainer on what is TPM and how to enable it, so stay tuned for more details. Until then, let us know if your PC is compatible with Windows 11 down in the comments section. Also, share your thoughts on the new Windows 11 design changes and Android app support.


