Fix Set User Settings to Driver Failed Error on Windows (2021)
We have included three different ways to resolve the ‘Set user settings to driver failed’ error on Windows. The first method lets you permanently delete the Alps pointing service so you don’t encounter the error again. The second method allows you to disable the service altogether and the last one lets you keep the Alps touchpad service but with an updated driver.
All that said, let’s now move to the steps. As always, you can use the table of contents below to navigate between the methods detailed in this article.
Delete the Alps Pointing Driver
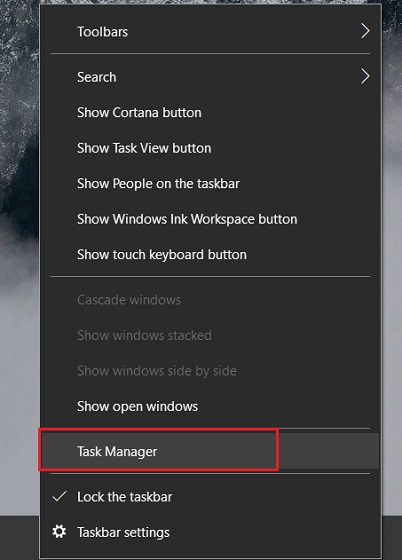
- First of all, right-click on the Taskbar and open the Task Manager.
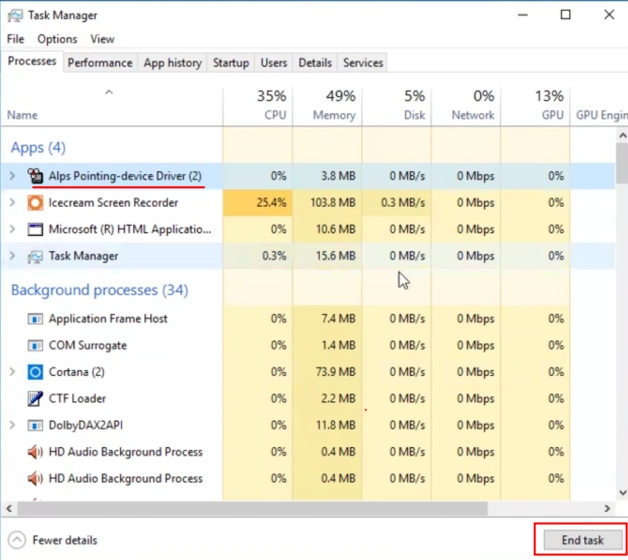
- Under the “Processes” tab, look for “Alps-pointing device Driver” and select it. After that, click on the “End task” button at the bottom-right corner.
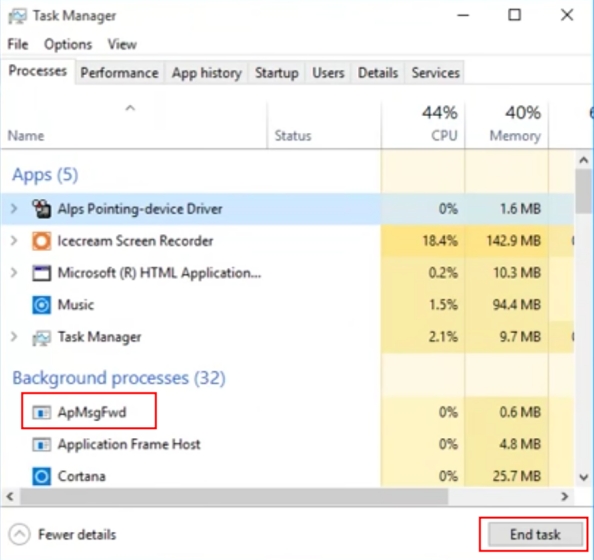
- Similarly, look for “ApMsgFwd” under the same “Processes” tab and end the task.
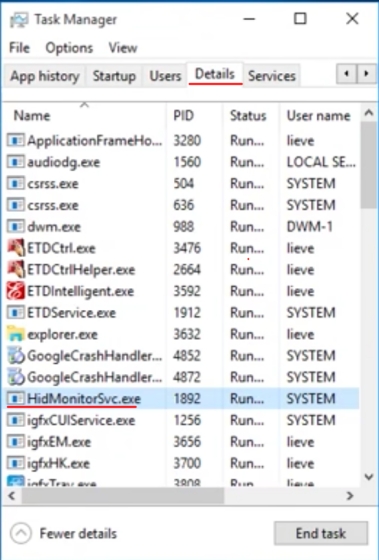
- Next, move to the “Details” tab on Task Manager and locate “HidMonitorSvc.exe”. Again, end the task.
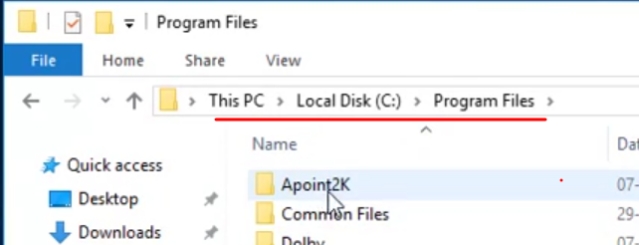
- Having done that, open the “C” drive and navigate to “Program Files”. Here, look for the “Apoint2K” folder. If the folder is not available there then look inside the “Program Files (x86)” folder.
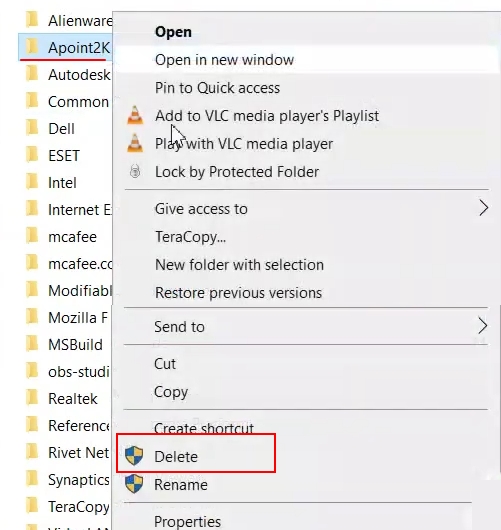
- Now, simply delete the “Apoint2K” folder and you are done. Finally, with all the processes closed and no program directory available, you won’t encounter ‘Set user settings to driver failed’ error again on your Windows PC. Having said that, keep in mind, you need to be on the Administrator account to execute the delete operation.
Rename the Apoint.exe File
If the above method didn’t resolve the issue, try renaming the Apoint.exe file which is responsible for the annoying “Set User Settings to Driver Failed” error on Windows laptops. This will prevent Windows to call the Alps Pointing Driver since the file name has been modified. Here are the steps to follow.
- First off, open the File Explorer and navigate to the C drive. Here, open “Program Files” and look for the “Apoint2K” folder. If the Apoint2K folder is not there, try looking under the “Program Files (x86)” folder.
- Next, right-click on the “Apoint2K” folder and select “Properties”.
- Now, move to the “Security” tab and click on “Advanced”.
- On the Advanced Security Settings window, click on “Change“.
- You will get the option to enter the object name. Enter “Everyone” and click on “Check Names”. This will validate the object name. Now, click on “OK” and Everyone will become the owner, allowing us to modify the folder and its contents.
- Next, click on the “Add” button in the Advanced Security Settings window.
- Following that, click on “Select a principal“and enter “Everyone” just like how we did above. Under “Type”, select “Allow” from the drop-down menu. Finally, select the “Full control” checkbox and click on “OK”.
- Now, click on “OK” on other open windows. After that, open the “Apoint2K” folder and locate the “Apoint.exe” file. Rename it to anything you like. For example, I have renamed it to “nothing.exe”.
- Finally, restart your computer and from now on, you will not face “Set User Settings to Driver Failed” error on your Windows computer.
Disable the Service
If you don’t have access to the Administrator account and can’t go ahead with the delete operation then you can take another route. You can disable the ‘Alps’ service from running on your PC. This way, the service won’t run and you won’t face the ‘Set user settings to driver failed’ error on your Windows PC.
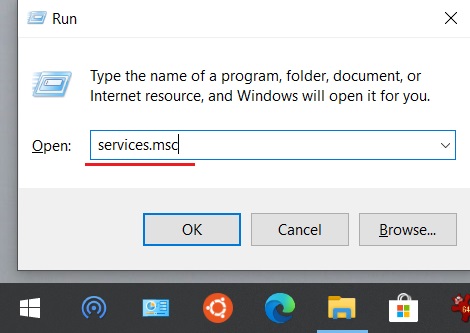
- First of all, end all the processes by following steps 1-4 from the above section. After that, press the “Windows” and “R” keys at once to open the “Run” window. Here, type services.msc and hit enter.
- The Windows Services window will open up. Here, look for “Alps SMBus Monitor Service” and right-click on it to open “Properties”.
- Now, click on “Stop” and change the “Startup type” to “Disabled“. After that, click on the “Ok” button.
- Next, open the Task Manager and move to the “Startup” tab. Here, locate “Alps Pointing Device” and disable it straight away. Finally, restart your computer. Now, the ‘Set user settings to driver failed’ error will not occur on your PC.
Reinstall the Driver
As we know, there are some bugs with the Alps touchpad driver that results in ‘Set user settings to driver failed’ error. And I have mentioned that deleting the program folder or disabling the service would easily stop the persistent dialog. However, deleting or disabling the service is not an option for many users who actually use the Alps service for various touchpad gestures. So, if you want to fix the error and also want to keep the Alps pointing service then follow these steps.
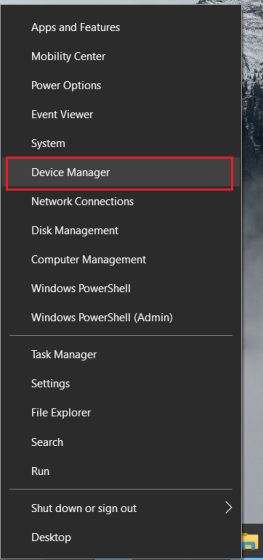
- Right-click on the start menu and open “Device Manager“.
- Here, expand the “Mice and other pointing devices” menu and right-click on “Alps pointing device“. After that, choose “Uninstall device”.
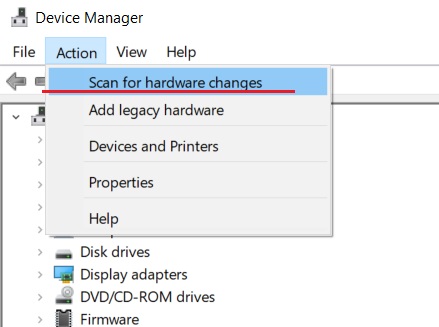
- Having done that, click on “Action” at the top and choose “Scan for hardware changes“. You would find that ‘Alps pointing device’ has been again reinstalled by your PC automatically.
- This time, right-click on ‘Alps pointing device’ and select “Update driver“.
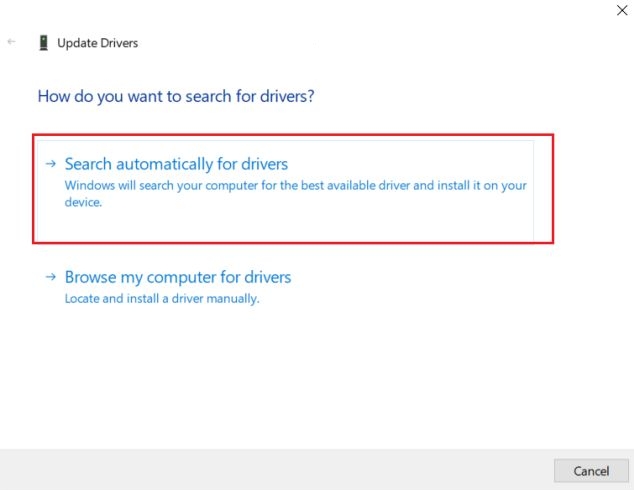
- Here, click on “Search automatically for drivers” and your Windows computer will start downloading the latest Alps driver from the internet. After the installation, restart your computer.
- Now, you should not encounter ‘Set user settings to driver failed’ error on your Windows PC. In case, the error still persists then you have no option other than to follow the above methods– either delete the program or disable the service.
Resolve Set User Settings to Driver Failed Error on Lenovo and Sony Laptops
So that is how you can fix ‘Set user settings to driver failed’ error on Windows computers, especially laptops by Lenovo and Sony that ship with the Alps touchpad driver. Apart from that, if the Alps touchpad driver has been mistakenly installed on your Windows desktop then there is nothing to worry. You can follow the same steps mentioned above to stop the persistent dialog alert. Anyway, that is all from us. If you want to learn how to speed up Windows 10 computers then head over to our linked article. Furthermore, you can also go through our separate article on how to fix common problems on Windows 10.
