How to Connect Apple Pencil to iPad
While we will be covering how to connect your Apple Pencil to the iPad, this article will also contain a lot of other elements like how to charge it, quick diagnostics, and even tricks you can use. If you already know what you want, use the table below to jump to it.
Apple Pencil Compatibility List
If you’ve stumbled upon this article before getting an Apple Pencil, you’re in luck. Depending on your iPad model, you might need to get either the 1st or 2nd generation Apple Pencil. In order to ensure you don’t make a mistake, check out the list below and get the correct Apple Pencil to connect it to your iPad.
Apple Pencil 1st Generation
The following iPad models are compatible with the 1st Gen Apple Pencil:
iPad (8th generation)iPad mini (5th generation)iPad (7th generation)iPad (6th generation)iPad Air (3rd generation)iPad Pro 12.9-inch (1st or 2nd generation)iPad Pro 10.5-inchiPad Pro 9.7-inch
Apple Pencil 2nd Generation
The following iPad models are compatible with the 2nd Gen Apple Pencil:
iPad Air (4th generation)iPad Pro 12.9-inch (3rd generation) and lateriPad Pro 11-inch (1st generation) and later
Now that you have your bearings, make sure to purchase the correct Apple Pencil so you can connect it and starting it with your iPad.
How to Connect the Apple Pencil 1st Generation
We will begin by showing you how to connect the 1st gen Apple Pencil to your iPad. Since the 1st gen relies on a lightning connector, that is what we will be using. Follow the steps below to do so:
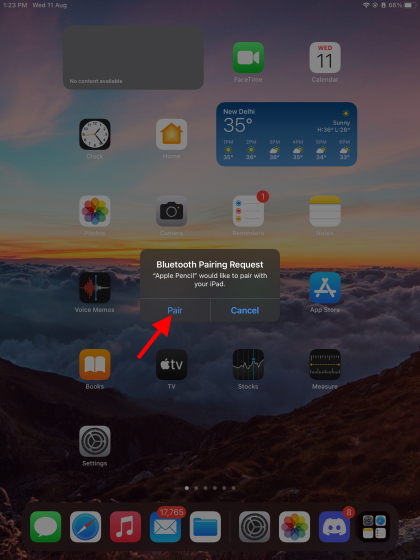
- Taking your Apple Pencil in hand, remove the back cap to expose the lightning output.
- Plug the Apple Pencil in to your iPad’s lightning connector. It’s the same one you use to charge it.
- You will see a pop-up box appear like the one you see below. Simply tap Pair and you’re all done! The Apple Pencil will remain connected to your iPad as long it’s not restarted, put in Airplane mode, or connected to another iPad. If any of that happens, simply follow the steps above again to reconnect it.
How to Connect the Apple Pencil 2nd Generation
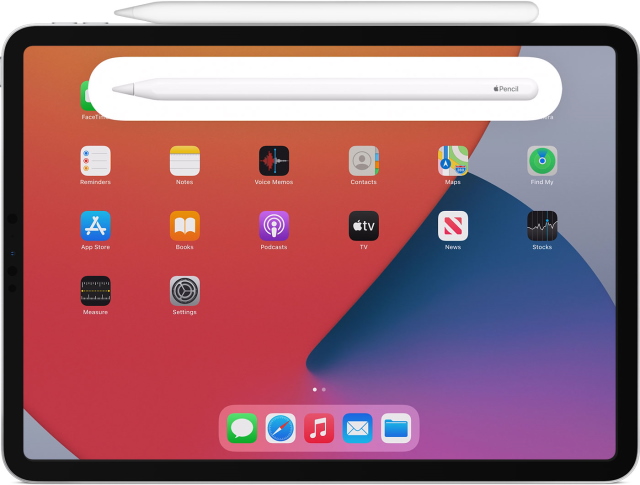
The newer and more feature-rich 2nd gen Apple Pencil is even easier to connect to an iPad. We will be relying on the iPad’s magnetic connector for this. Simply follow the steps below:
- Taking the Apple Pencil in hand, attach it to the side of your iPad. The onboard magnetic connector will ensure it sticks.
- An Apple Pencil overlay will pop up along with a message to connect it to your iPad. Simply press Connect and you’re done!
As you can see, connecting the 2nd gen Apple Pencil to the iPad is almost effortless. Remember to follow the steps above if it gets disconnected.
Can’t Connect the Apple Pencil to the iPad? Try These Tips
If you can’t connect your either generation Apple Pencil to your iPad, don’t fret. There’s a high chance you’re skipping a few obvious steps. Check out the tips we have written below and make sure you’re doing nothing wrong.
1. Make Sure Bluetooth Is Turned On
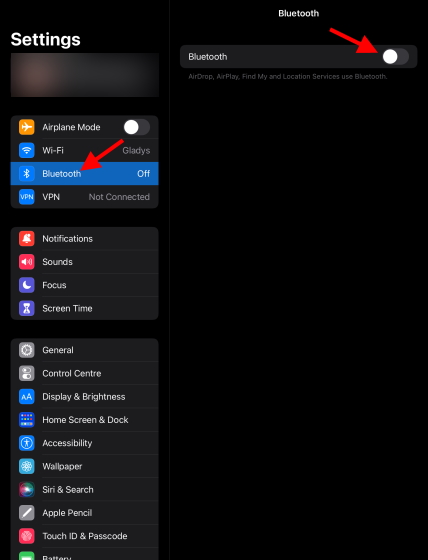
The Apple Pencil relies on a Bluetooth connection that must be maintained at all times. If you don’t use BT devices, you might have turned it off by default. Make sure the iPad’s Bluetooth is turned on to connect the Apple Pencil to your iPad. You can turn on Bluetooth on your iPad by going to Settings > Bluetooth and simply toggling it on. Do this and try again.
2. Make Sure the Apple Pencil Is Charged
As obvious as this sounds, you might have forgotten to charge your Apple Pencil before you began connecting it to your iPad. Make sure to charge your Apple Pencil to at least 50% before you begin connecting it to the iPad. Keep reading to learn how to charge either generation Apple Pencil.
3. Make Sure the Connectors Aren’t Damaged
While the chances of this happening are very rare, there is a chance the lightning connectors on your Apple Pencil or iPad might be damaged. To check for damage, simply hold the Pencil’s output tip close your eye, and inspect for any metal that may have been chipped. For the iPad, try shining a flashlight in its lightning connector and look for anything that might have been lodged there. If there is, don’t repair it yourself. Immediately take it to an Apple Repair Center.
4. Make Sure Not to Force the Pencil the Wrong Way In
While the 1st Gen Apple Pencil is very easy to plug in the iPad, people do encounter problems from time to time. Whether you cannot connect the Apple Pencil to your iPad because of a damaged side or maybe because it’s not fitting all the way in, do not force it. If you’re encountering unusual resistance from the Pencil or the iPad, take both the devices to an Apple Store and ask the executives to help you out. Failure to do so may cause expensive damage to your devices.
How to Disconnect Your Apple Pencil from the iPad
Whether you’re unpairing your Apple Pencil to use it with another device or simply performing some troubleshooting, the process is very easy. Follow the steps below to do so:
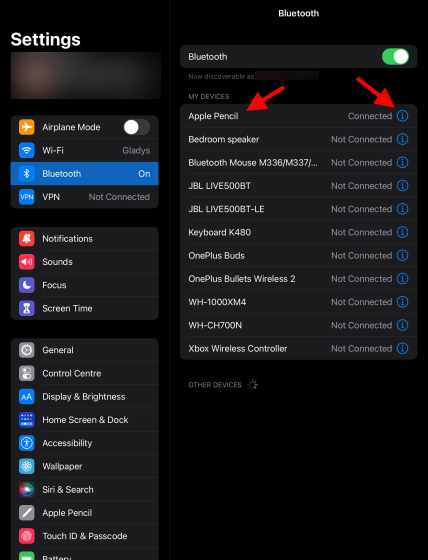
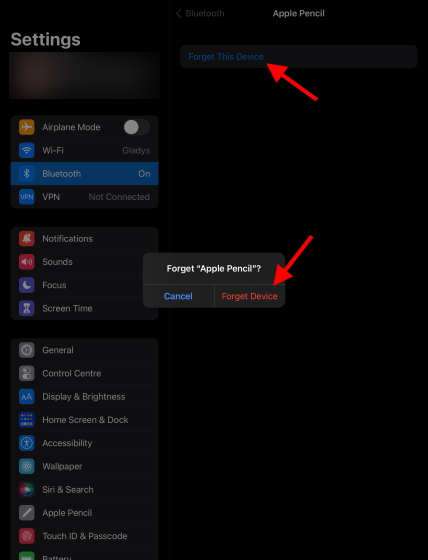
- Open the Settings app on the iPad.
- From the sidebar, find and tap Bluetooth and a list will open up.
- Find Apple Pencil on the list and tap the blue i icon you see.
- Tap Forget this Device and then tap it again on the box that appears to confirm. Your Apple Pencil has now been disconnected from your iPad. You can choose to pair it again if you want.
How to Check Apple Pencil Battery Life
Depending on your Apple Pencil’s generation, you can use a specific method to check its battery life. Follow the relevant section below:
Apple Pencil 1st Generation
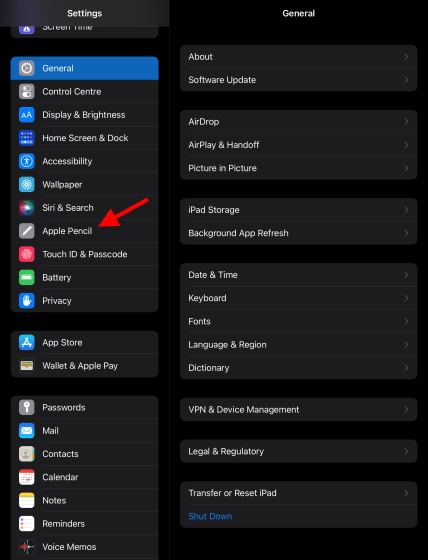
- Open the Settings app on the iPad.
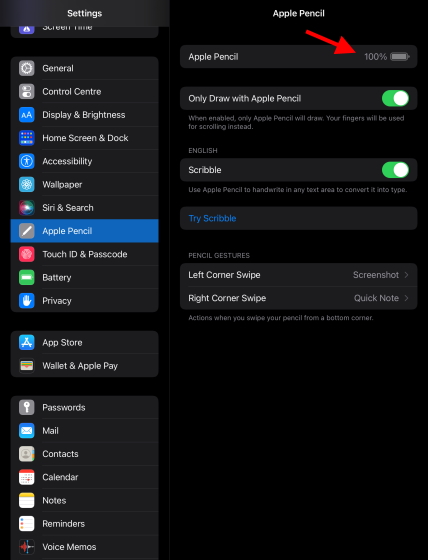
- Using the sidebar, find and tap Apple Pencil and a menu will open up.
- You will see the Apple Pencil’s current charge level as the first option. You can even play around with the other settings you see here if you wish.
Apple Pencil 2nd Generation
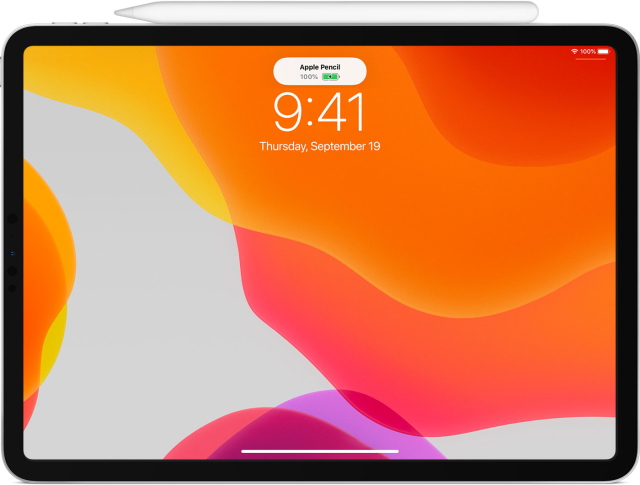
Like connecting, even seeing the battery charge of the 2nd Gen Apple Pencil is easier. Follow the steps below:
- Once paired to your iPad, simply attach the Apple Pencil to the side of your iPad.
- A small pop-up will appear for a few moments showing the Pencil’s current charge level.
You can choose to repeat the above steps to see the pop-up again. However, if you don’t want to do this, you can also check the Apple Pencil’s charge level by following the 1st Gen steps. Apart from these methods, you can keep a track of your Apple Pencil’s remaining battery charge using the battery widget for iPad. Read on to learn how to add this widget to your iPad screen.
How to Add the Apple Pencil Battery Widget to iPad
With the release of iPadOS 15, widgets have become more intuitive. While before you were restricted to just the today view, you can now place dedicated widgets on the iPad’s Home Screen. Similarly, iPad has a dedicated widget for the device’s batteries. Follow the steps below to add the battery widget to your iPad:
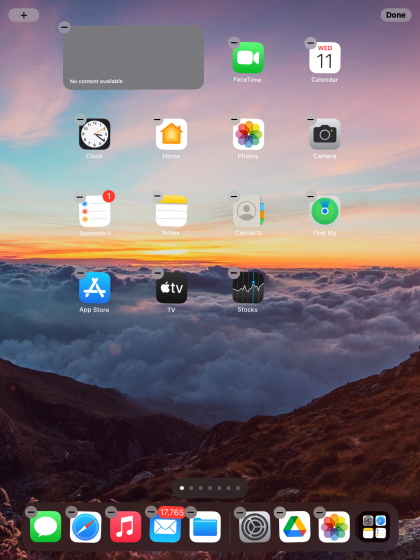
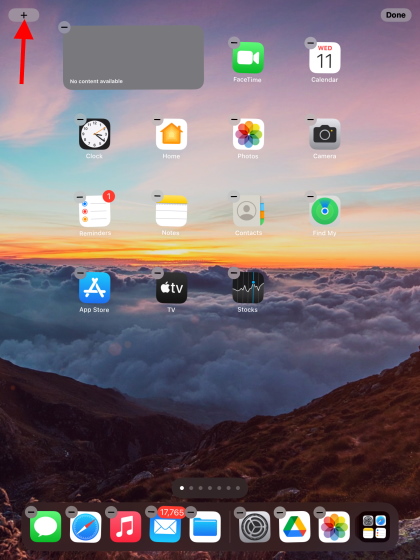
- Tap and hold an empty area on the iPad’s home screen and it will enter jiggle mode.
- Tap the Plus sign on the top left of the screen and a list will open up.
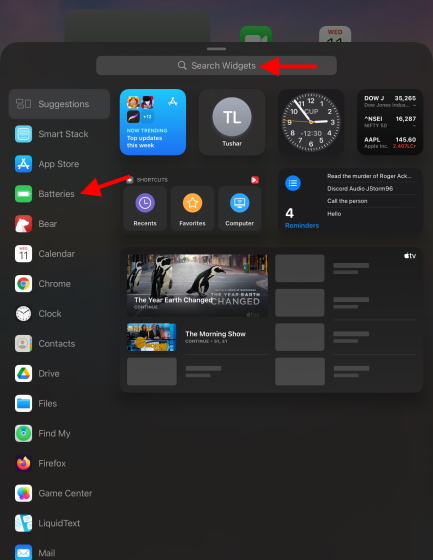
- Choose the Batteries section from the sidebar or if you can’t see it then use the Search Bar above.
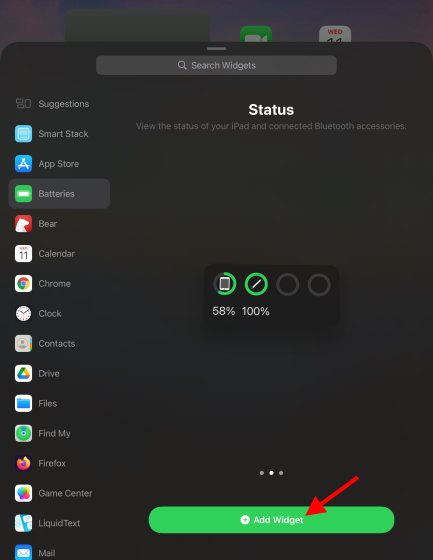
- Choose from the available widget sizes and simply press Add Widget to add it to your home screen. You can also drag and drop it if you wish.
You can now see the Apple Pencil’s charge level at any time you wish. Furthermore, any more devices that you connect will also reflect here so feel free to go all out.
How to Charge the Apple Pencil
Like before, depending on your Apple Pencil’s generation, the ways to charge it are different. Read the relevant section and power up.
Apple Pencil 1st Generation
- Remove the cap from the Apple Pencil’s back to reveal its lightning connector.
- Simply plug it into the iPad’s lightning connector the same way you did to connect it.
Your Apple Pencil is now charging and you can remove it after 10 minutes. Repeat the same process whenever you wish to charge it again.
If you don’t wish to connect the Apple Pencil to your iPad, you can choose to attach it to your USB Power Adapter by using the Apple Pencil Charging Adapter. The charging adapter can be found in the same box your Apple Pencil came in.
Apple Pencil 2nd Generation
- Once paired to your iPad, simply attach the Apple Pencil to the side of your iPad.
- A small pop-up will appear for a few moments showing the current charge and indicating that it has begun.
Let the Apple Pencil charge for 10 minutes and then remove it for use. Repeat the above steps when you find it low on battery.
Quick Tips and Tricks for Your New Apple Pencil
Now that your Apple Pencil is up and running, you’re ready to take on the iPad world. However, before you go off creating the next Starry Night, slow down and check out these cool Apple Pencil tips and tricks.
1. Use QuickNote
One of the most notable of these best iPadOS 15 features is the new QuickNote and the seamless ability it brings to note taking. Swiping up from the bottom right of the iPad with your Apple Pencil now brings up a floating QuickNote. You can use this QuickNote to jot down quick details and thoughts all the while using your iPad. You can even create links to apps and conversations. Using QuickNotes is quite simple and an easy way to take notes on your iPad.
2. Use Your Pencil to Markup PDFs
How often have you wished that you could just draw or take notes on a PDF without having to print it. Fortunately, the Apple Pencil solves this problem and much more with its annotation capabilities. Using an annotation app like PDF Expert, you can easily import and markup any number of PDF documents without difficulty. You can choose to highlight, mark, take side notes on any PDF, and store it away for future use. Check out this handy app and try your hand at PDF markup.
Price: Free (Offers In-App Purchases)
Get PDF Expert
3. Create a Digital Signature
One of the Apple Pencil’s amazing capabilities is the ability to record and place digital signatures that you can add to any document. With the global COVID pandemic pushing us all in our houses, the time to visit offices and physically sign documents is past right now. However, that doesn’t stop life. So instead of etching a signature on paper and then scanning it, try downloading an app like Adobe Acrobat which provides native digital signature placement. You can even try the above PDF Expert as it also provides this feature. Download them and sign away.
Price: Free (Offers In-App Purchases)
Get Adobe Acrobat | PDF Expert
4. Create a Quick Note While the iPad Is Locked
While you might be having fun using QuickNote on your iPad, there’s an even faster way to take a note. And you can do it all while your iPad is locked! Simply tap anywhere on a locked iPad screen and the Notes app will open up with a blank page. You can use this page to jot down any number of odd things and the note will be stored in your Notes library. Use this handy trick the next time you want to note something in a hurry.
5. Use Your Apple Pencil for Drawing and Sketching
One of the greatest uses of the Apple Pencil is the immense potential it holds in the artistic area. No matter if you’re a budding artist looking to get into drawing, or a professional looking for apps, there’s something for everyone. These best Apple Pencil apps will allow you the creative freedom you have been seeking. From drawing and sketching apps to notetaking ones, check them all out. Your Apple Pencil will prove to be the perfect stylus to draw that perfect curve and capture your imagination on virtual paper.
Connect Your Apple Pencil to the iPad and Have Fun
Well that’s how you can connect your Apple Pencil to your iPad easily. Even though the first generation Apple Pencil is easy to pair, the new second-gen Apple Pencil makes pairing even easier and completely seamless. So, which Apple Pencil are you using, and how has your experience been? Share your opinions in the comments below.